EECS 183 Labs
EECS 183 Lab 7: Classes
Lab due on your scheduled lab day (March 10-13)
Lab accepted for full credit until Monday, March 16, 2025, 11:59 pm Eastern
Direct submission link
In this lab, you are writing code to master the use of classes. You will complete part of Project 4 in the lab.
Starter Files
You can download the starter files using this link.
After downloading and unzipping, you will find the following files in the starter-files folder:
Position.cpp: source code file you will use for the exercise. This file is identical to the file of the same name for Project 4.Position.h: header file with the Position class definition. This file is identical to the file of the same name for Project 4.utility.h: header file with declarations you will need for Project 4 and this lab.test.cpp: source file you will use to test your Position class functions forPosition.cppgrid1.txt: text data file you may use for testing.grid2.txt: text data file you may use for testing.
IMPORTANT: For this lab, you must include all files in a single project in Xcode or Visual Studio.
IMPORTANT: Do not change any part of the header files
Position.horutility.h.
Lab Assignment
Tasks to Complete
- To complete this portion of the lab, you need to do the following steps:
- Start a new project with your IDE using the starter files according.
- Write your test cases in
test.cppto test the functions you will implement inPosition.cpp. - Write the implementations for the functions in
Position.cpp: - Test your functions using the test cases you have written.
- Submit your
Position.cpp,test.cpp,grid1.txt,and grid2.txtto the autograder.- NOTE:
grid1.txtandgrid2.txtare optional to submit to the autograder. They may help you with your test cases for the lab.
- NOTE:
Position.cpp
IMPORTANT: This is the same file you will use for Project 4: Battleship. Once you complete the lab you may use your lab solutions for Project 4.
- This file contains the definition (implementation) of a class that represents a Position for the game Battleship – think a two-dimensional coordinate system: (row, column).
- Each Position has an row value and a column value.
- The values for row and col must always be within specified bounds, accomplished using the
check_range()function declared inPosition.h - A valid position is any position on a valid grid (grid of max size
MAX_GRID_SIZE*MAX_GRID_SIZE) - When reading a Position, it will be in one of two forms:
- The form
(row,col), which includes the parentheses and comma - Example:
(1,B) - The form
rowcolwith no space between the row and column characters - Example:
1B. Seegrid1.txtfor an example of how points are represented.
- The form
- When writing a coordinate, it will be in only one form:
- The form
(row, col), which includes the parentheses and comma - Example:
(1,B)
- The form

IMPORTANT: A Position of (1,A) will be stored as having a row being 0 and a col being 0
test.cpp
- Now test all the member functions you wrote for the
Positionclass intest.cpp. With classes, you can have compile errors that do not show up until you call the individual member functions. Testing is critical when programming with classes. To get you started, we provided you with sample test cases in thetest.cppfile. You’ll need more tests than this to catch all the bugs on the Autograder. - For testing, you may submit two data files to the Autograder, but they must be called
grid1.txtandgrid2.txt.
NOTE: The first text file
grid1.txtserves as an example of the two different forms of a Position. You should use this file to test yourPosition::read()function. The other text file,grid2.txtis empty. You can use this file to test yourPosition::write()function.
File I/O
File Locations - Xcode
Follow along with the steps below to set up your Xcode project the right way.
NOTE: The steps and videos below were created for project 4. The process is exactly the same for the lab, there will just be a different set of starter files.
This video tutorial shows how to create your project.
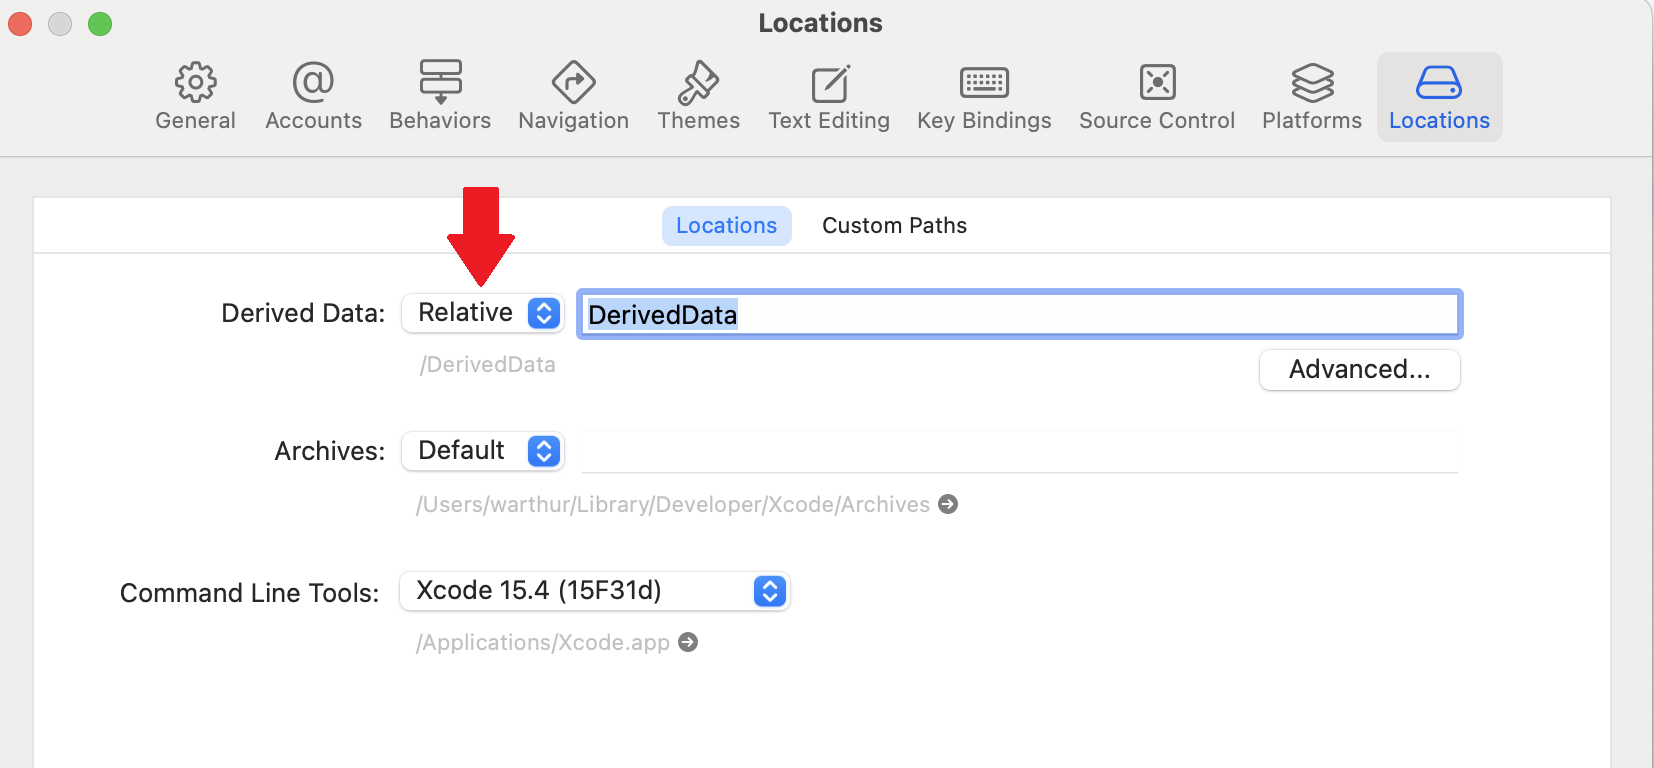
There are a few things that must be done for Xcode. First, ensure that Derived Data is stored relative to your project folder. Select Xcode > Settings… (may be called Preferences in older versions of Xcode) in the menu bar, click on Locations icon at the top on the window and choose Relative next to Derived Data. This will ensure that executables are saved in your Project folder.
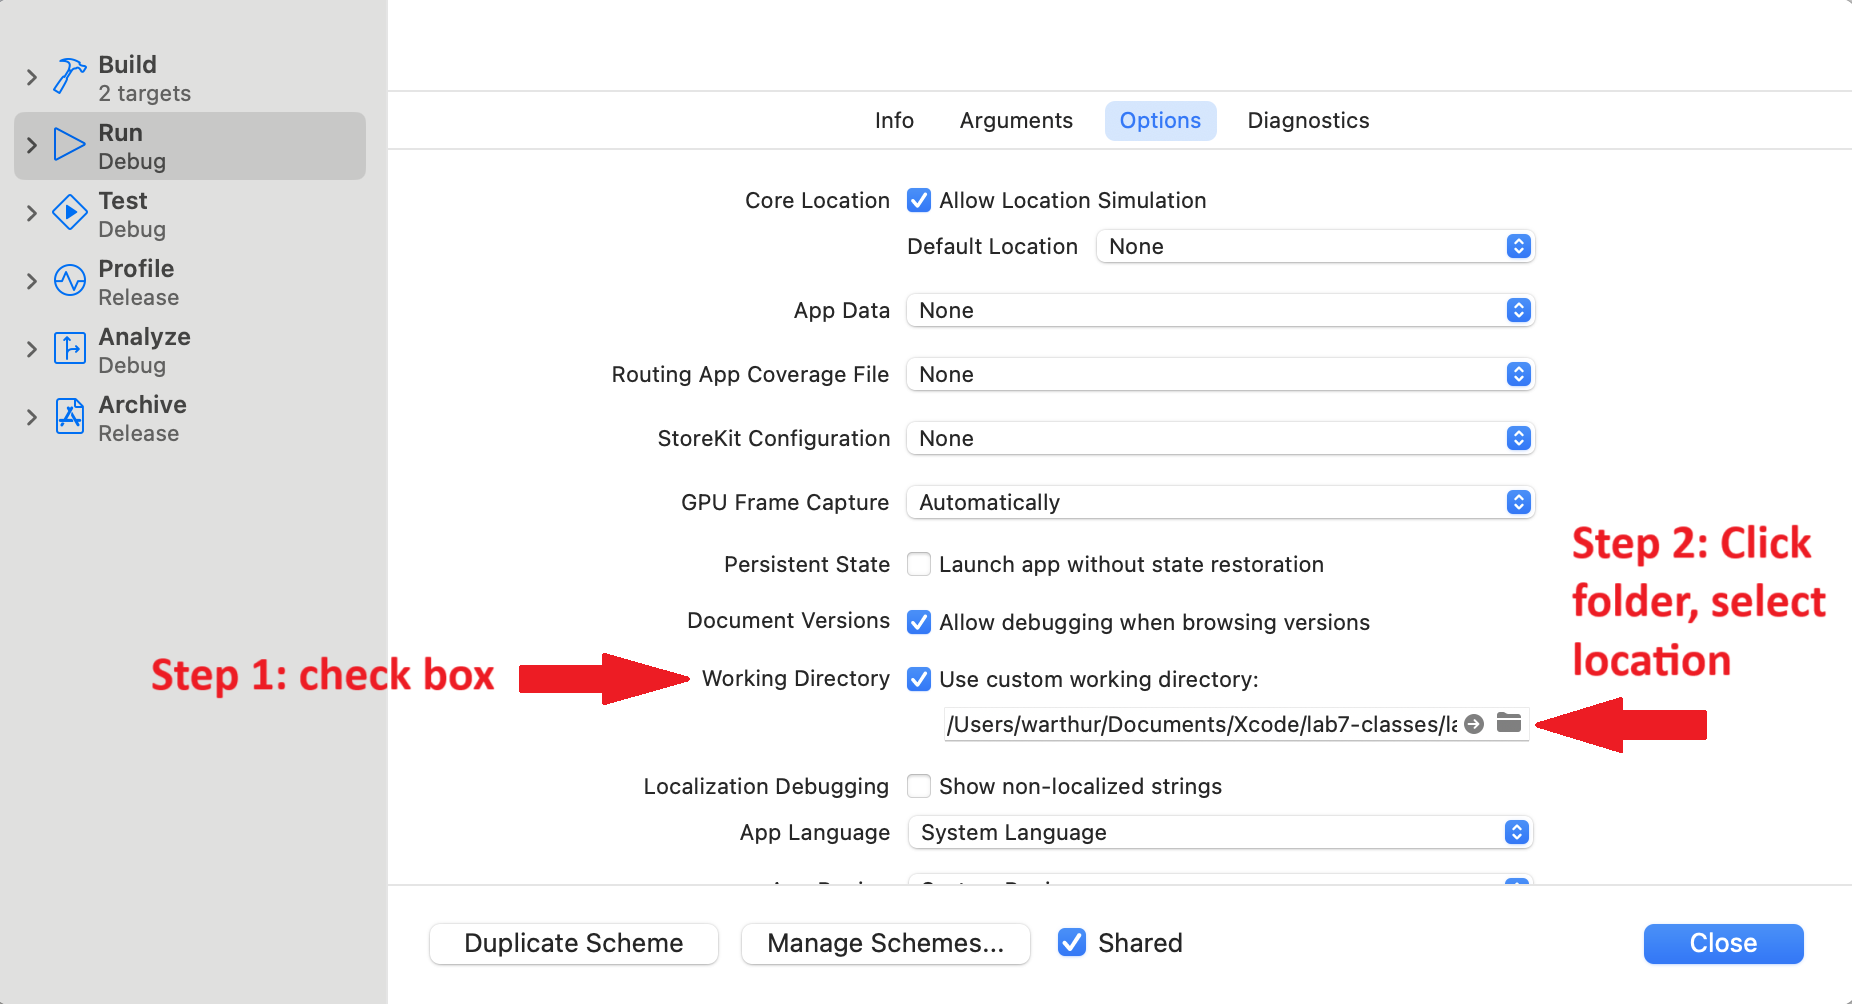
Then, tell Xcode to look for files in the folder where all other project files are stored. From the menu bar, choose Product > Scheme > Edit Scheme.

Select Run on the left, Options on top and then select the checkbox Use custom working directory and navigate to your Project folder where you will store input files.
Now you can place input txt files right with your .h and
.cpp files.
NOTE: If you move your project folder, you’ll have to reset the project’s working directory.
Visual Studio
Following the instructions for Setting Up Project 1 in the Getting Started with Visual Studio document will put the starter files in the correct folder. The only difference from Project 1 is that there are more starter files to add. These steps are replicated for project 4 in the video below. This process is the same for this lab, there will just be a different set of starter files.
This video tutorial shows how to create your project.
NOTE: The steps and videos below were created for project 4. The process is exactly the same for the lab, there will just be a different set of starter files.
Verifying File IO and Project Setup
It is imperative that your Xcode/Visual studio project is set up correctly to read and write text files. Be sure to edit the scheme for Xcode and that the files are in the correct directory in Visual Studio.
Here is a test case that you can add to your test.cpp to check if your text files, like grid1.txt and grid2.txt, are in the correct directory. Be sure to call fileCheck in your startTests function!
void fileCheck() {

    // open one of the text files that are part of the starter code
    ifstream ins;
    ins.open("grid1.txt");

    // if the file was not in the correct directory, the stream state is fail
    if (ins.fail()) {
        cout << "Could not open grid1.txt" << endl;
    }
    else {
        cout << "Success! Text files are in the right directory." << endl;
    }
    ins.close();

    return;
}
If you get the message "Could not open grid1.txt" try editing the scheme again (Mac) or checking that you have the project files in the correct directory (Windows).
If you cannot get the text files in the correct directory, then try adding the following to your file_check test.
// if the file is not in the right directory, try this:
ofstream outs;
outs.open("crazyfilename");
outs << "find the file named crazyfilename in windows explorer or finder";
outs.close();
Then open Windows Explorer (Windows) or Finder (Mac) and search for the file named crazyfilename. Once you find the folder with that file name, copy all of the .txt files from the project starter files to that directory. Then try the file_check test again.
How to Submit
-
When ready to submit to the autograder, visit https://autograder.io/web/project/3576. You will submit your
Position.cpp,test.cpp,grid1.txt, andgrid2.txtfiles. -
NOTE: it is possible to receive full credit for this lab without submitting one or both of
grid1.txtandgrid2.txtto the autograder. However, you will definitely need both to fully test yourPosition::read()andPosition::write()functions on your computer.
IMPORTANT: For all labs in EECS 183, to receive a grade, every student must individually submit the Lab Submission. Late submissions for Labs will not be accepted for credit.
- Once you receive a grade of 10 of 10 points from the autograder you will have received full credit for this lab.