Lab 1 - College Admissions
Due Date and Links
-
Lab due on your scheduled lab day
-
Lab accepted for full credit until Monday, January 19, 11:59 pm Eastern
-
Part 2 - Direct Google form link - this is not the same as the attendance form!
In this lab, you will write a short interactive program. While working on the lab, you will practice using some of the tools you need to master Project 1 and beyond.
By completing this lab assignment, you will learn to:
- Create a simple program in Python.
- Use an IDE (Integrated Development Environment): Visual Studio Code.
- Use operators to perform interactive I/O (Input and Output) using Python.
- Complete and submit programming assignments in the course.
- Navigate the autograder and understand autograder feedback for labs and projects.
Requirements
You will complete the lab in teams of around 4 students. For all labs in EECS 183, each student must submit their code individually to the autograder to receive a grade. If unable to work in a team, you may work independently.
An overview of tasks for this lab follows:
- Open the
admissions.pystarter file in VS Code and run it. - Modify the
admissions.pystarter file with your team’s solution to the lab. - After completing all parts of the lab assignment, submit your completed program to the autograder.
- Complete the reflection questions and submit to the Google form.
Starter Files
Hopefully you’ve already completed the first three tutorials so that you know how to edit and run code. If not, let’s make sure to get you the help you need to finish them as soon as possible (e.g. today or tomorrow); hang in there, you’ll get it! Please start by talking to your lab instructor. For now, you can get by just a little bit longer by following the workaround instructions.
- Download the starter files and put them in your
Documents/EECS_183/labs/lab_1folder.- Windows users: you must unzip the starter files first. Tutorial reminder: Start at Finding the Downloads folder and continue through the end of the “Unzipping a Zip File” section.
- Mac tutorial reminder: Start at Finding the Downloads folder and continue through the end of the “Moving a Folder from Downloads to Documents” section.
- Start VS Code and open the
EECS_183folder in VS Code.- Tutorial reminder: opening VS Code in your EECS_183 folder.
- In VS Code, check the
EXPLORERtab, and open yourlabsfolder, thenlab_1, and findadmissions.pyin there. Double-clickadmissions.pyto open it in the VS Code editor pane.
We’re ready to start programming!
Running the Starter Code
Credit: This portion of the lab was adapted from the College Admissions Algorithms assignment developed by Dr. Casey Fiesler at University of Colorado, Boulder.
Let’s imagine that you work in a college admissions office, and you need to create a program to help admissions officers evaluate prospective students. A recommendation score will be based on the following data:
- GPA (range 0.0 - 5.0)
- SAT score (range 400 - 1600)
- Demonstrated interest (range 0 - 10)
- Curriculum strength (range 0 - 10)
When you run the admissions.py file in VS Code, you should see this message appear:
Please enter the GPA out of 5.0:
The program is now waiting for you to type in a number. Let’s type 3.5 and hit enter (Windows) or return (Mac). You should now see this:
Please enter the GPA out of 5.0: 3.5
Please enter the SAT score out of 1600:
In this sample output, and in all sample output throughout the semester, any line numbers shown at the beginning of each line should not appear in your actual output. They are just there for ease of reference.
Let’s type in 1400 for the SAT score and hit enter / return. You should now see this:
Please enter the GPA out of 5.0: 3.5
Please enter the SAT score out of 1600: 1400
Please enter the demonstrated interest out of 10:
Let’s type 8 and hit enter / return, meaning the prospective student has demonstrated a good amount of interest in the university. You should now see this:
Please enter the GPA out of 5.0: 3.5
Please enter the SAT score out of 1600: 1400
Please enter the demonstrated interest out of 10: 8
Please enter the high school curriculum strength out of 10:
Let’s type 7 for this and hit enter / return. Finally, you should see this…
Please enter the GPA out of 5.0: 3.5
Please enter the SAT score out of 1600: 1400
Please enter the demonstrated interest out of 10: 8
Please enter the high school curriculum strength out of 10: 7
The calculated admissions score is:
0
… and the program is done. The 0 is because we haven’t written the code to calculate the admissions score yet. That’s what you’ll be doing next!
Finishing the Admissions Algorithm (5 points of 10)
Let’s step through the admissions.py code. Have that file open in VS Code as you read and complete the steps below.
Program Comment
First, modify the block comment at the top of the file.
"""
admissions.py

<#Name(s)#>
<#Uniqname(s)#>

EECS 183: Lab - College Admissions

<#description#>
"""
Replace the #Name(s)# and #Uniqname(s)# with your name and uniqname, along with the names and uniqnames of your teammates if you are working in a team.
Also, replace the #description# with a very brief summary of the lab.
Constants
As we saw above, the starter code already does some of the work for us. Let’s take a look. After the introductory comment, we define some constants:
GPA_WEIGHT = 0.4
SAT_WEIGHT = 0.3
DEM_INTEREST_WEIGHT = 0.1
CURRICULUM_STRENGTH_WEIGHT = 0.2
When I call these constants instead of variables, I’m just using that word for us as humans. Formally in the Python program, these are variables. But by calling them constants, I’m indicating our intention to set them once and then never change them again. I further express that intention by using all capital letters with underscores between words for the constants’ names. Again, Python doesn’t recognize any meaning in this naming convention, but it’s a signal to us humans that these values shouldn’t be changed later in the program. They’re just set once right here.
The constants represent the weights that each of the four factors will have in calculating the final recommendation score. Notice that they sum to 1, as in 100%.
Opening Print
Next, we need to make a little welcome message, College Admissions Calculator, show up when the program is run. You’ll need to use a print statement. Add this to your code under the corresponding “TO-DO” comment.
Reading Input from the User
Consider the next bit of code:
# Ask user to enter data. Store in variables named:
# gpa, sat, dem_interest, and curriculum_strength
gpa = float(input("Please enter the GPA out of 5.0: "))
sat = int(input("Please enter the SAT score out of 1600: "))
dem_interest = int(input(
    "Please enter the demonstrated interest out of 10: "
))
curriculum_strength = int(input(
    "Please enter the high school curriculum strength out of 10: "
))
There’s a lot happening here! We’ll talk about these ideas in lecture 3, so if you haven’t had lecture 3 yet and feel uncertain about the above, that’s ok! Let’s look at the big ideas:
gpa,sat,dem_interest, andcurriculum_strengthare variables that will hold the values the user types in.- The
inputfunction displays a prompt (the text in quotes inside the parentheses) and waits for the user to type something and hit enter / return. - The
inputfunction always returns astr. That’s an abbreviation for string, which is a data type in Python that represents text. But we want to do math with these values, so we need to convert them to numerical types. We do this using thefloatandintfunctions, which convert astrrepresenting a number into afloat(a number with decimal places) orint(an integer), respectively. We’ll talk about how these functions are used in lecture 3 as well, so don’t worry if you’re not totally clear on this yet. This is just a first experience for you. - The
dem_interestandcurriculum_strengthassignment statements look a little different, split across multiple lines. This is just to make the code easier to read. Python allows us to split long lines across multiple lines if we use parentheses. You’ll see more about this when you work on project 1 and consider the course style guide.
Computing the Score
Next, let’s consider the score calculation:
# Formula: GPA_WEIGHT * (gpa * 2)
#          + SAT_WEIGHT * (sat / 160)
#          + DEM_INTEREST_WEIGHT * dem_interest
#          + CURRICULUM_STRENGTH_WEIGHT * curriculum_strength
# TO-DO: Create a variable named score that equals the expected chance
# of admission. Use the formula given in the comment above.
# Be sure to REPLACE the score = 0 line below with your answer.
score = 0
As you can see in the comment above, the score calculation involves multiplying (*) each of the four factors by their respective weights, and then adding (+) those products together. There’s one division (/) operation as well. Your task is to replace the score = 0 line with code that implements this formula.
Multiplying the Score by 10
Next, we have this:
# TO-DO: Multiply the score by 10.
# That is, make the new score variable value be
# 10 times the current score variable value.
You’ll need to use an assignment statement (=) to accomplish this.
Change Score Type and Announce
A little more code is given next:
# Change score to an int
score = int(score)

# Announce the score to the user
print("The calculated admissions score is: ")
The first line changes the score variable from a float to an int, which just means we drop any decimal places. The next line prints a message to the user. There’s nothing for you to add here, just take note of what this code does.
Printing the Score
Finally, we have this “TO DO” comment:
# TO DO: print the score on a line by itself
Here, use a print statement to print the value of the score variable.
Once you’ve filled all this in, run the code again to see if it computes the correct score. For the numbers used in the example above (3.5, 1400, 8, 7) the final score should be 76. More details on expected behavior and checking your code are described further below.
Problem-Solving with Programming
Now that you’ve done a little bit of programming, let’s consider how to approach programming problems in general.
Define the problem
Begin by defining the problem you are tasked with solving. Take time to understand what you are attempting to accomplish. What is the purpose of the program? What do you need to provide the program for it to work? What do you expect to be the effects of running the program? What might be modified?
These questions are answered in the problem statement above. Consider what input the program takes and what it prints.
Writing an Algorithm
An algorithm is a series of steps used to solve a problem. Above, you completed an algorithm for the College Admissions Calculator. An algorithm can be written using different languages, but it must contain the steps required to solve the problem. You could write an algorithm using English or another language. However, it is more helpful to write an algorithm using pseudocode. Pseudocode is an informal description of an algorithm.
Let’s consider one part of this lab assignment accordingly. Suppose you’re thinking about the need to prompt the user to enter their student data with Please enter your GPA on a scale of 0.0-5.0
There is more than one task in this statement. So we add them to our algorithm:
- Print “Please enter your GPA out of 5.0: “
- User enters their GPA
Unfortunately, this is still too vague to describe well enough how to solve the problem. How will the user enter their GPA? What will we use to represent that number? Let’s update our pseudocode to be more descriptive of what steps you will take in your algorithm.
- Print “Please enter your GPA out of 5.0: “
- Let GPA = what the user enters as their GPA
The above pseudocode describes the steps to ask the user for their GPA and store that information. By thinking through the steps in a bit more detail like this, the actual code becomes easier to write.
How to Test
Before writing the Python code for the program, stop and consider how you will test the program you write. What do you expect the effects of your program to be? If your program takes input, what will the results be for a range of inputs? For instance, if a student’s GPA is 2.5, SAT score is 1300, Demonstrated interest is 10, and Curriculum strength is 5, with weights of 0.4, 0.3, 0.1, 0.2 respectively, what would you expect the program to print for the student’s expected chance of admission?
In this case, we would expect the prompts we have indicated to appear in the terminal, and if we input the values above (2.5, 1300, 10, 5), the effects of the program should be to tell us there that the student has a score of 64.
It is important to consider how to test your program before writing the code using your IDE. We didn’t do that this time, but we will in the future. This method is called test-driven development and is the best approach to writing programs.
Sample Output
Assume we are using the same weights from above:
GPA_WEIGHT = 0.4
SAT_WEIGHT = 0.3
DEM_INTEREST_WEIGHT = 0.1
CURRICULUM_STRENGTH_WEIGHT = 0.2
The user input to the program is given in red in the sample runs below.
Sample Run 1
College Admissions Calculator
Please enter the GPA out of 5.0: 2.5
Please enter the SAT score out of 1600: 1300
Please enter the demonstrated interest out of 10: 10
Please enter the high school curriculum strength out of 10: 5

The calculated admissions score is:
64
Sample Run 2
College Admissions Calculator
Please enter the GPA out of 5.0: 3.5
Please enter the SAT score out of 1600: 1400
Please enter the demonstrated interest out of 10: 7
Please enter the high school curriculum strength out of 10: 5

The calculated admissions score is:
71
Sample Run 3
College Admissions Calculator
Please enter the GPA out of 5.0: 4.9
Please enter the SAT score out of 1600:  1370
Please enter the demonstrated interest out of 10: 3
Please enter the high school curriculum strength out of 10: 6

The calculated admissions score is:
79
Autograder
The autograder is used in EECS 183 to submit your labs. It is also used to determine grades earned on the labs. For all labs in the course, you must submit your solutions to the autograder web interface. Each assignment will have its own autograder webpage.
How to Submit
-
When you’re ready to submit to the autograder, visit https://autograder.io/web/project/3585. You will submit your
admissions.pyfile, which should contain your solution for this lab as one program. -
Drag and drop your completed
admissions.pyfile to the box labeled Drop files here or select Choose file and navigate to your file. The file you submit to the autograder MUST be calledadmissions.py.
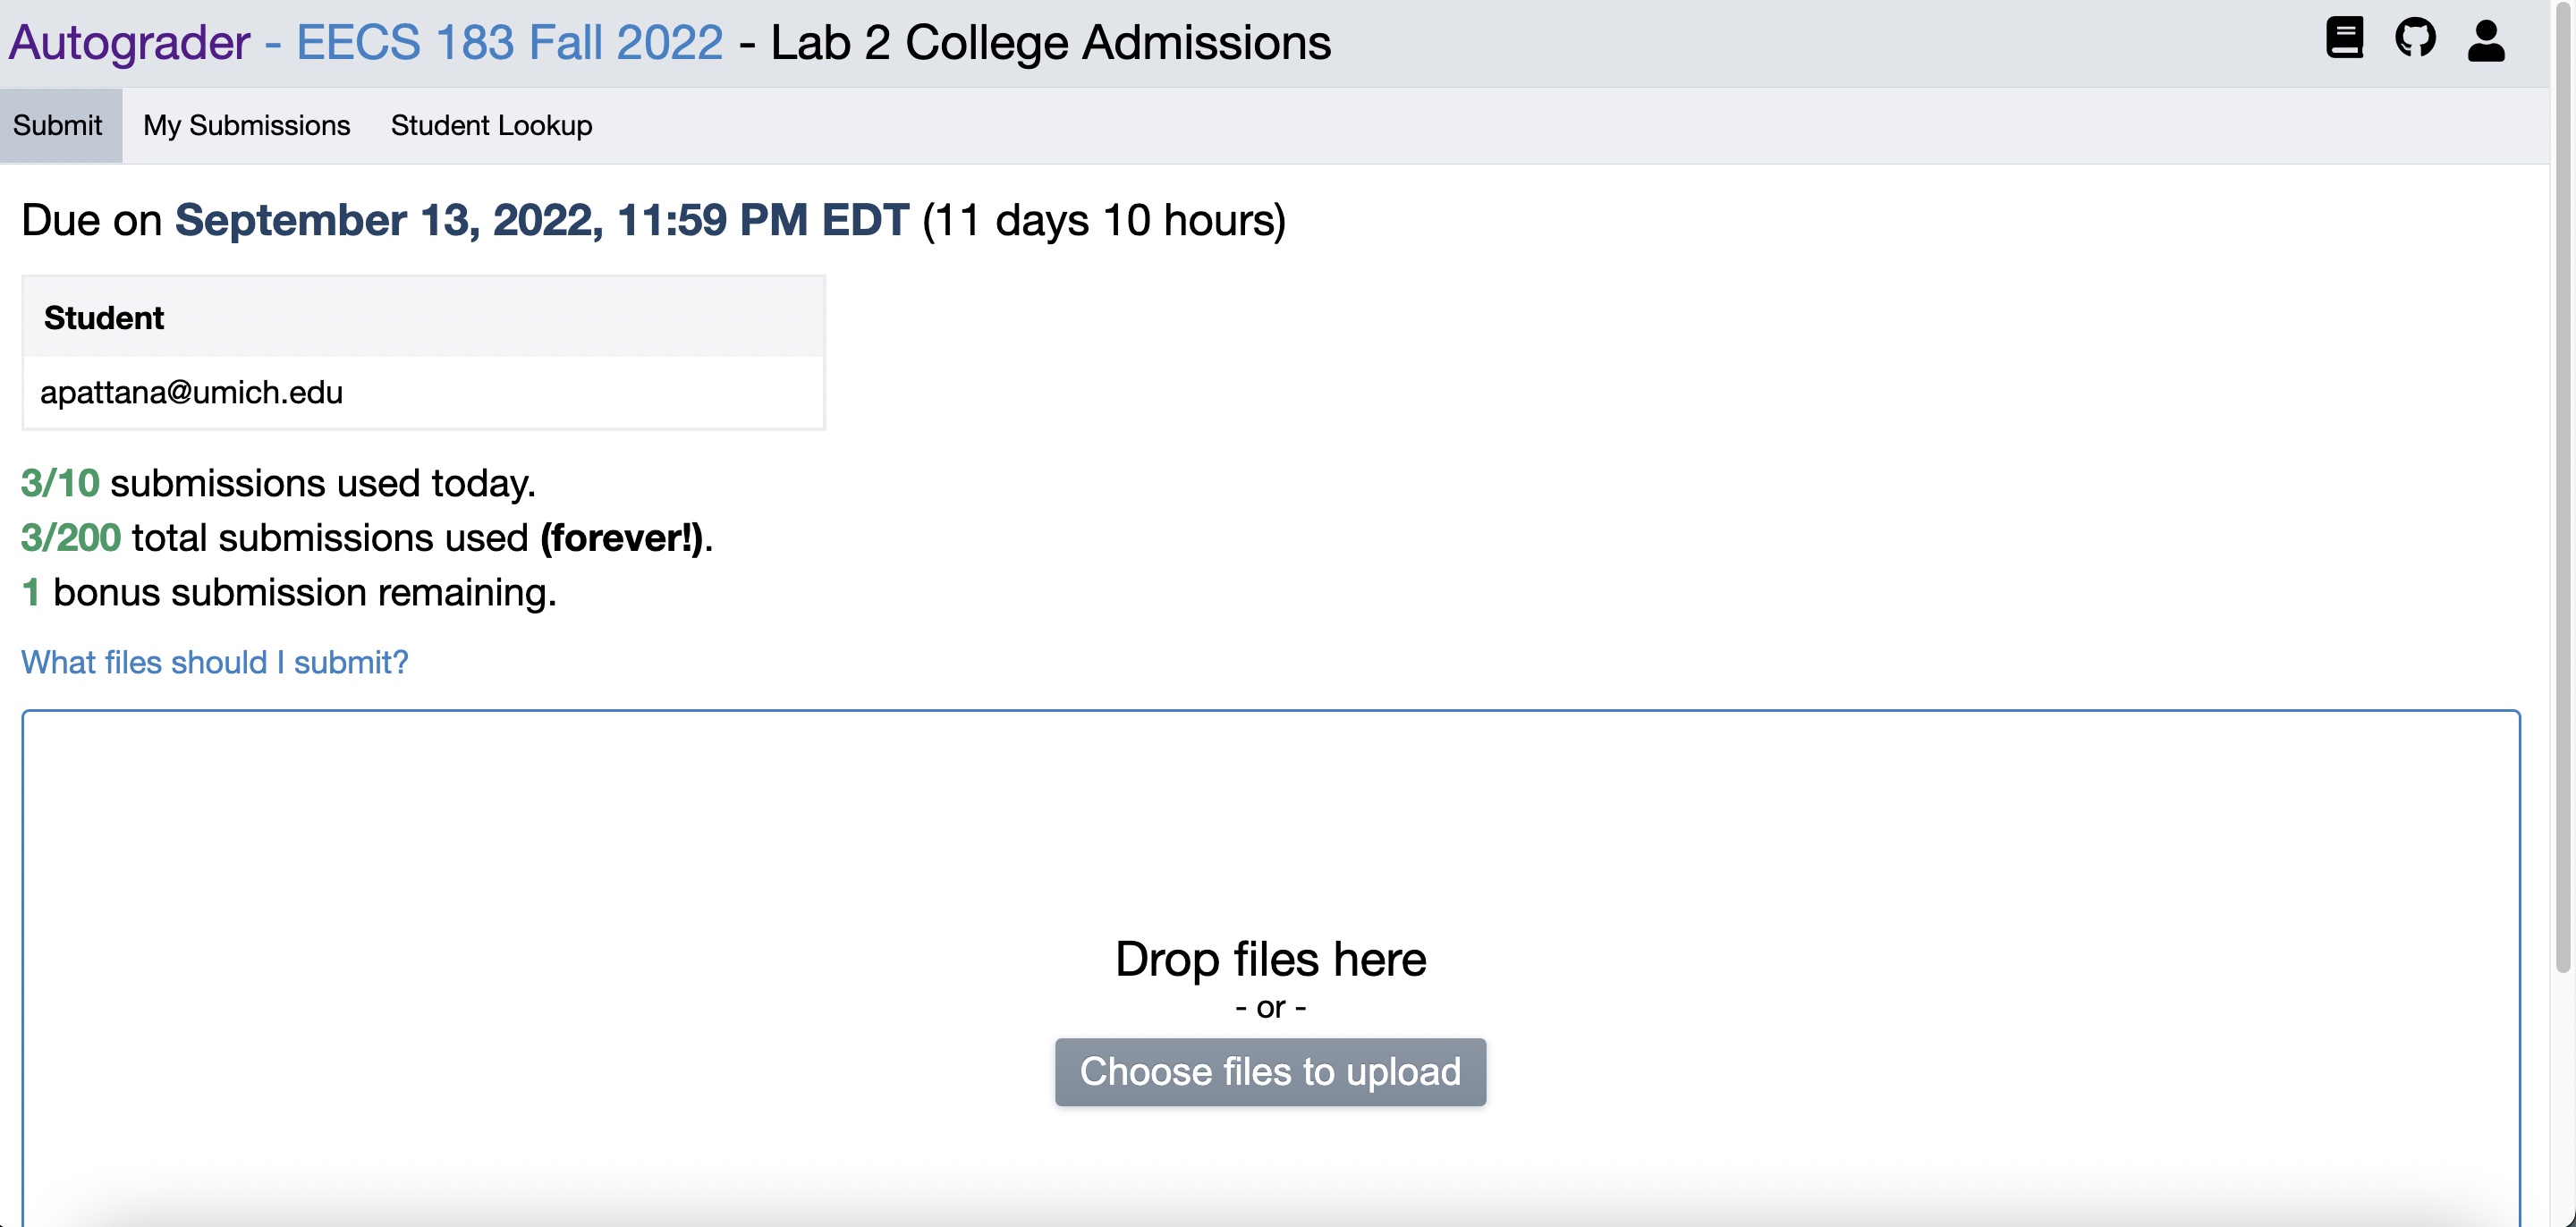
- If you’re confident that you’ve selected the correct file, click
Submitto submit to the autograder. The autograder will tell you if you did not select a file of the correct name. In this case, we strongly urge you NOT to hit submit, but choose the correct file instead.
Important: Late submissions for labs will not be accepted for credit.
For all projects and labs in the course, we grade your highest submission score. In projects in EECS courses at U-M, you are allowed a very limited number of submissions with feedback, typically four per day. However, for this lab, you are allowed ten submissions per day with feedback. Once you receive a grade of 5 points for admissions.py from the autograder, you will have received full credit for this portion of the lab.
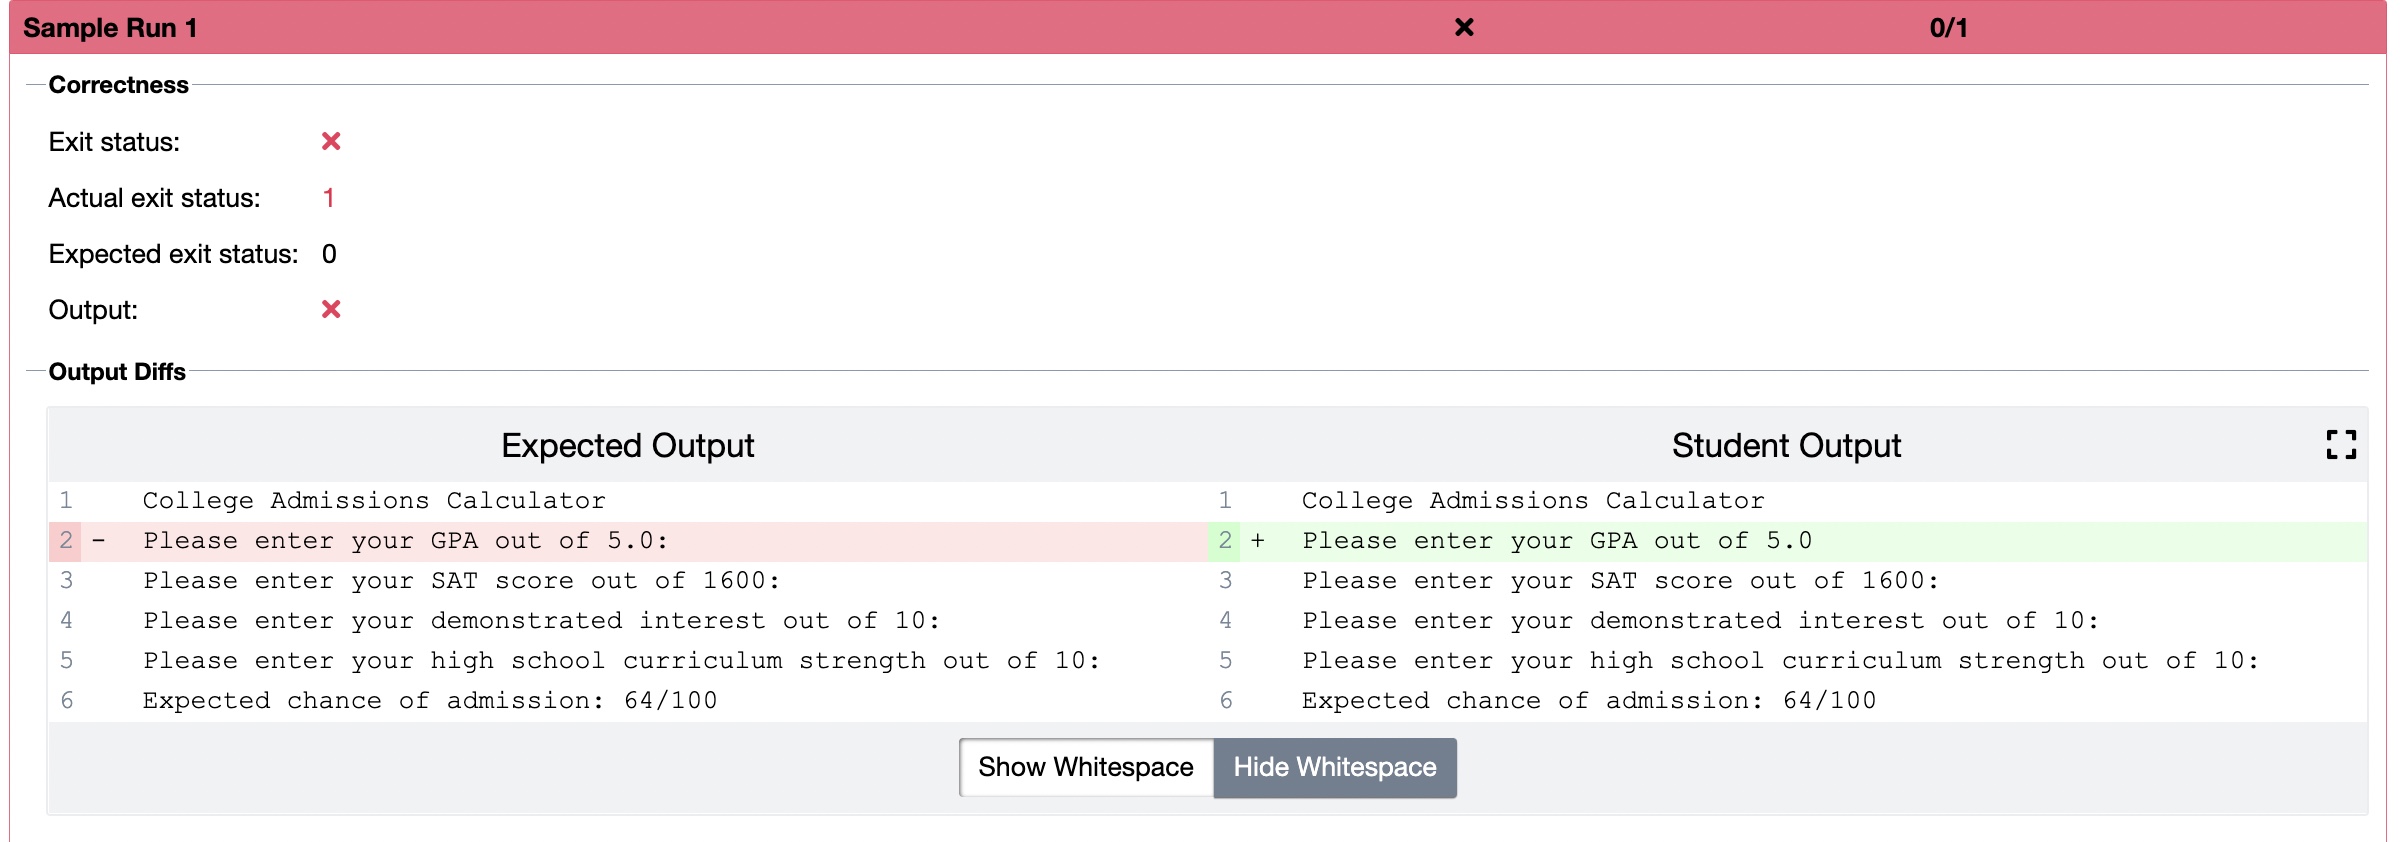
Autograder Feedback
You can see the grade and feedback from your submissions by selecting “My Submissions” in the upper-left corner. Selecting a submission from the left tab will show the tests and feedback for the lab. When your submissions fail one or more tests, feedback about the test will be displayed. The autograder will show a line-by-line difference between the expected output for a correct solution and the output of your program.
Things to Look Out For
When reviewing your program to make sure you are getting the correct output, it can be easy to miss small errors. Here are some things to keep an eye out for:
- Spelling mistakes - this is probably one of the easiest, yet frustrating errors that will fail the autograder so make sure you spell everything exactly as it is in the spec (the specification – the description of what to do for this lab).
- Math errors - double check the formula you compute and make sure it matches what is needed. You may find additional parentheses useful.
diffchecker.com is also a really helpful website to catch any differences between your program’s output and the sample outputs.
Once you have submitted your solution to the autograder and received full credit, continue onto part 2 of the lab.
Part 2: Biased Algorithms (5 points of 10)
This part of the lab assignment is different from the Google form for attendance!
Like all other lab assignments you are encouraged to work with your peers to develop shared answers to the questions here, but everyone must submit the assignment to receive credit.
Consider ways that the above algorithm might systematically misclassify some students. For example, what if a student has a 0 for demonstrated interest because they don’t use social media or don’t have access to a home computer? Consider ways that this algorithm may not cover all cases and discuss with your partners how you would create a more well-rounded algorithm.
Consider the following questions:
- What other variables do you think should be considered by a college admissions algorithm? Are there any variables that current algorithms (or even admissions officers) might use that are not ethical/equitable? (e.g. Donor status)
- What weights did you use to calculate the recommendation score? Why did you pick these values specifically? How can these values miss out on eligible students?
- What do we lose by automating the college admissions process? What is the ideal balance between automation and human interference in this context?
- Can you think of another process that college students go through that would be unethical to automate?
When you’re ready, submit your answers to the Google form. You will receive an email confirmation of your submission.
We’ll talk about these kinds of issues more later in the semester, when we discuss some concepts from the book Weapons of Math Destruction.
Once you have submitted admissions.py to the autograder and responded to the reflection questions in the Google form, you have successfully completed the lab! But don’t leave yet! I urge you to keep working on the tutorials if you haven’t finished them all yet (not just 1-3). You’ll be glad you did, and it’ll be great to have your lab instructor around for questions when you’re doing it!
Copyright and Academic Integrity
© 2026 Bill Arthur and Steven Bogaerts.
This work is licensed under a Creative Commons Attribution-NonCommercial-ShareAlike 4.0 International License.

All materials provided for this course, including but not limited to labs, projects, notes, and starter code, are the copyrighted intellectual property of the author(s) listed in the copyright notice above. While these materials are licensed for public non-commercial use, this license does not grant you permission to post or republish your solutions to these assignments.
It is strictly prohibited to post, share, or otherwise distribute solution code (in part or in full) in any manner or on any platform, public or private, where it may be accessed by anyone other than the course staff. This includes, but is not limited to:
- Public-facing websites (like a personal blog or public GitHub repo).
- Solution-sharing websites (like Chegg or Course Hero).
- Private collections, archives, or repositories (such as student group “test banks,” club wikis, or shared Google Drives).
- Group messaging platforms (like Discord or Slack).
To do so is a violation of the university’s academic integrity policy and will be treated as such.
Asking questions by posting small code snippets to our private course discussion forum is not a violation of this policy.