(2) Setting Up Python
Due: Monday, January 12, 11:59 PM Eastern
Installing Python
In this document I describe how to install Python on your personal computer so you can run Python programs. Please follow the instructions carefully, even if you already have a version of Python installed. The little details matter, and missing them could mean errors that need to be fixed later.
Jungeun Seo made some video walkthroughs for tutorials 1 - 3. You can find them in Tutorial Videos folder on the Google Drive. You’re not required to watch them, but you may find them helpful in combination with the written instructions.
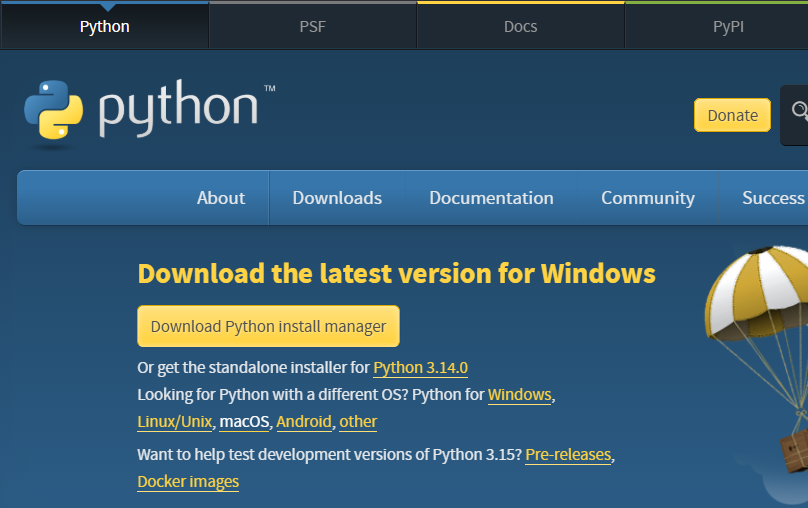
Visit https://www.python.org/downloads/ and press the big yellow button to download the Python install manager.
Mac users: Slight differences in Python installer download (Click for details)
The screenshot below is for Windows, but on a Mac, the above URL will take you to the Mac download page instead, so just click the similar-looking big yellow button. Also click “Allow” when Safari asks you to allow the download.
Open your Downloads folder and find the file you downloaded. It should be named something like “python-manager” or “python” with a version number. Double-click on the file. In the window that pops up, choose “Install Python” and follow the instructions that appear, while noting the following:
- In Windows, you may be asked about making paths longer - type
yand hit enter to agree to this and approve when another window pops up asking for permission. - For both Mac and Windows, when you have the option to add Python to the “path”, type
yand hit enter (Windows) or return (Mac) to do so. This is an important step. - If you are asked to install
CPython, typeYand hit enter (Windows) or return (Mac). - In MacOS, you may be asked if you want to move the Python installer to the Trash after installation. You can agree to this.
- You can decline opening the online help, unless you want it.
If something goes wrong, one option is to uninstall Python (if it installed) and try again from scratch. On Windows, you can uninstall Python from the Apps & features settings. On a Mac, you can drag the Python application from the Applications folder to the Trash. If you need further help, please ask anyone on staff.
Once the installation completes, we’re ready to try it out! First, we’ll use something called a terminal.
What is a Terminal?
A terminal is a place where special commands can be typed as instructions for a computer. Using a terminal is not the same as programming in Python, though there can be some similarities. Visually, a terminal is just a window, often with a black background. Here’s one example, from Windows:
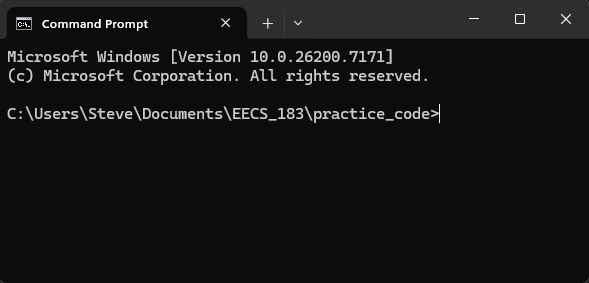
We can ignore text like that shown in the first two lines of the image above. Different text or no such text at all may appear depending on your computer.
Here’s another example, from MacOS:
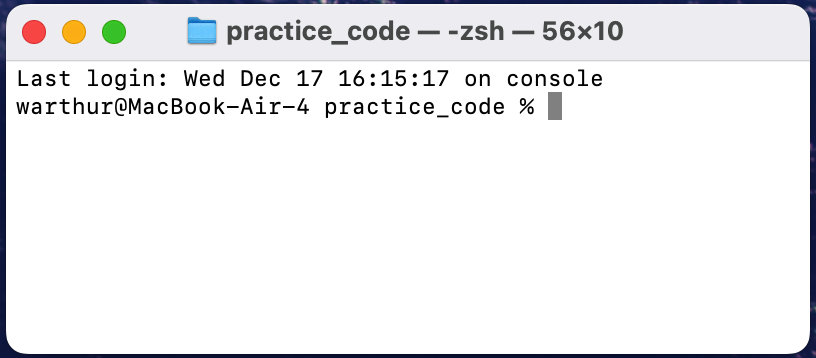
Again, we can ignore the first line of text in the image. Different text or no such text at all may appear depending on your computer.
The text C:\Users\Steve\Documents\EECS_183\practice_code> (Windows) or warthur@MacBook-Air-4 practice_code % (Mac) above is called the prompt, because it’s meant to prompt us (ask us) to type a command. When a terminal window is open, it’s always open inside of some folder; the part before the > (Windows) or % (Mac) names the folder in which the terminal is open.
Mac users: The prompt may look a little different (Click for details)
On a Mac, the prompt text will look a little different. If my Mac computer is named StevesMac, and I open the terminal in the practice_code folder, then it could look like any of the following, among other similar possibilities:
StevesMac:practice_code Steve%StevesMac:~/Documents/EECS_183/practice_code Steve%StevesMac:~/Documents/EECS_183/practice_code Steve$
In the image, you can see that the cursor is just to the right of the > or % symbol. This is where we can type a command. The terminal will be an important tool for us to run our Python programs. Terminals can do so much more too, but we won’t deal with that in this course.
Running a Python Program in a Terminal
Navigate to your EECS_183 folder using the File Explorer (Windows) or Finder (Mac), and then expand the box below corresponding to your operating system.
Windows Users: Terminal (Click for details)
Open the practice_code folder. Right-click in an open area in the folder and choose Open in Terminal. This is the easiest way to open a terminal inside of the practice_code folder.
In the window that pops up, type python hello.py and then press enter.
If you get a message that the command is not recognized or anything like that, then the easiest thing to do is to again run the installer file you downloaded. Choose the Modify option, click Next to skip the first part, and then look for a check box that says Add Python to environment variables or Add python.exe to PATH.
When you’ve done this, you should see something like the following: 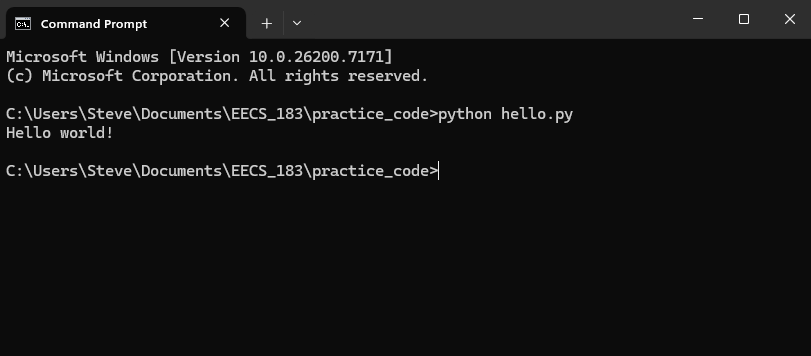 Note that the result of the program is that the message
 Hello world! appears in the terminal.
Mac Users: Terminal (Click for details)
Control-click on the practice_code folder and choose New Terminal at Folder. This is the easiest way to open a terminal inside of the practice_code folder.
In the window that pops up, type python3 hello.py and then press return. Note that the result of the program is that the message Hello world! appears in the terminal.
Once you’ve completed the above, you’ve run your first Python program! Usually we’ll do this in VS Code, but that requires just a little more setup.
Did you get an error? (Click for details)
-
If you get an error message saying the command
python/python3is not recognized or not found, then there’s something wrong with your installation. Please try to follow the Python installation instructions above again, being careful not to skip any steps, and ask for help as needed. -
If you see a message about a
SyntaxError, then there’s a mistake in yourhello.pyfile. Remember it should have exactly the following text and nothing else:print("Hello world!")
By default, the Windows installation uses the name python, while the Mac installation uses the name python3. Please keep this in mind.
Copyright and Academic Integrity
© 2026 Steven Bogaerts.
Materials for this assignment were developed with assistance from course staff, including Jungeun Seo.
This work is licensed under a Creative Commons Attribution-NonCommercial-ShareAlike 4.0 International License.

All materials provided for this course, including but not limited to labs, projects, notes, and starter code, are the copyrighted intellectual property of the author(s) listed in the copyright notice above. While these materials are licensed for public non-commercial use, this license does not grant you permission to post or republish your solutions to these assignments.
It is strictly prohibited to post, share, or otherwise distribute solution code (in part or in full) in any manner or on any platform, public or private, where it may be accessed by anyone other than the course staff. This includes, but is not limited to:
- Public-facing websites (like a personal blog or public GitHub repo).
- Solution-sharing websites (like Chegg or Course Hero).
- Private collections, archives, or repositories (such as student group “test banks,” club wikis, or shared Google Drives).
- Group messaging platforms (like Discord or Slack).
To do so is a violation of the university’s academic integrity policy and will be treated as such.
Asking questions by posting small code snippets to our private course discussion forum is not a violation of this policy.