fp-elevators
EECS 183 Final Project: Elevators
Core Due Friday, April 10, 8 pm link to Core Autograder here
Reach Due Tuesday, April 21, 8 pm link to Reach Autograder here - opening after Core due
Elevators is a project that dabbles in Game Design, Artificial Intelligence, and designing real-world systems. Using C++, you will complete an implementation for a game in which the player operates 3 elevators in a busy building, making decisions and servicing requests to keep the people inside the building as happy as possible.
In the Core, you will implement the core gameplay of the Elevator game. The high-level architecture of the project will be provided to you, and you will ensure that each piece that you build works correctly and fits together into one cohesive experience. In the Reach, you will write an artificial intelligence algorithm to play the game.
Here are the pages of this specification, for quick reference while you are coding the project:
Core:
- Reading and Writing
Person.cppElevator.cppFloor.cppMove.cppBuilding.cppGame.cppSatisfactionIndex.cpp
Reach:
We recommend reading through the information on this page and following the links to these pages as you come across them in the below sections.
Complete Spec Page Index
To make every page easy to find, here is a complete list of all additional specification pages:
- Team Registration
Person.cppElevator.cppFloor.cppMove.cppBuilding.cppGame.cppSatisfactionIndex.cppAI.cpp- Complete Elevators Run
- Reading and Writing
- Input Files
- Reach AI and Showcase
Final Project Logistics
Team Registration
You must register your 4-person team on the Core autograder and submit the starter code by Monday, March 30 at 11:59PM. We will grade only that you made a submission, not the grade the autograder gives you. You will receive full credit for registration even if you score 0 points on the autograder for this submission.
Note: To receive credit, your team must submit the starter files - you must make a submission to the autograder to receive credit.
You can view the team registration steps here.
Core and Reach
The Core is due on Friday, April 10 at 8PM, with an automatic extension until 11:59PM. You will complete and submit the following files for the Core: Person.cpp, Elevator.cpp, Floor.cpp, Move.cpp, Building.cpp, Game.cpp.
The Reach is due on Tuesday, April 21 at 8PM, with an automatic extension until 11:59PM. You will complete and submit the following files for the Reach: AI.cpp. Your Reach includes a presentation at the EECS 183 Showcase on April 23. The details about the Reach and Showcase presentation are here: Reach AI and Showcase.
Starter Files
You can download the starter files here.
When starting your Elevator project, you need to set your project up in a working directory, so that you can read from and write to files.
- For Xcode, follow the video tutorial in the Project Help YouTube video.
- For Visual Studio, you can follow the steps from Project 4 to set this up. The process and steps are identical to project 4, just substitute the starter files from the link above.
- Verify you have your project created correctly, with the necessary files in the correct folder on your computer, by following the instructions here to test. If you see the message
Error when loading the file! Verify that you have correctly created your project.when starting the game, this is the root cause.
Submission and Grading
There will be an autograder for both the Core and the Reach. Links are at the top of this page.
Your team will receive 4 submits each day and your best overall submission counts as your score. You need to submit all .cpp files in order for the project to compile, even if some of the .cpp files are unchanged from the starter files.
There is no extra credit and no late days for this project. No submissions will be accepted past the deadline. Style will not be graded for this project. Your test cases will not be submitted to the autograder or graded, but writing comprehensive tests will be essential for doing well on the project.
The final project grade is broken down as:
- 5 points: Team registration
- 5 points Showcase registration
- 50 points: Core autograder
- 50 points: Reach autograder
- 10 points: Team evaluations
- 10 points: Participation at Showcase, and your project poster, on April 23
Team evaluation forms will be sent over e-mail. The Core and Reach team evaluations are due where they appear in the course schedule.
Collaboration Policy
There are no limits on collaboration inside your team of four.
We want students to learn from and with each other, and we encourage you to collaborate. We also want to encourage you to reach out and get help when you need it. You are encouraged to:
- Give or receive help in understanding course concepts covered in lecture or lab.
- Practice and study with other students to prepare for assessments or exams.
- Consult with other students to better understand project specifications.
- Discuss general design principles or ideas as they relate to projects.
- Help others understand compiler errors or how to debug parts of their code.
The following are considered Honor Code violations:
- Submitting other’s - outside of your team - work as your own.
- Copying or deriving portions of your code from others’ solutions.
- Collaborating to write your code so that your solutions are identifiably similar.
- Sharing your code with others to use as a resource when writing their code.
- Receiving help from others to write your code.
- Sharing your code in any way, including making it publicly available in any form (e.g. a public GitHub repository or personal website).
The full collaboration policy can be found in the syllabus.
Overview
Gameplay
The elevators game allows the player to control elevators in a building with the goal of delivering the most people to their desired destination floors while minimizing the wait times (measured in anger levels) of those people.
The main objects that we deal with in the elevator system are as follows. We have 1 Building object. That Building has 10 Floors and 3 Elevators. Each Floor can have up to 10 Persons waiting for an elevator. (See Utility.h for the game parameters.)
A new game begins with all elevators on floor 0 not servicing any requests. During each turn, if there is a new event (i.e. a new person appearing), they will appear in the building on the appropriate floor. While they wait for the Player to send an elevator to their floor to pick them up, they will slowly get angrier (a valid angerLevel ranges from 0 through MAX_ANGER - 1) until this value hits MAX_ANGER and they explode. See the Person section for more info. Each explosion negatively affects the player’s score for the game, which is calculated based on how quickly they can service the people’s requests. The game will continue until either the player lets too many players explode or until they have processed and survived all the events in the game.in file.
Throughout the game, we measure time in ticks (or turns). You can think of a single tick, just as you would think of a second, minute, or any other standard unit of time. During each tick, the most up-to-date information about the game will be presented to the user, and they will have the option to react by entering a move.
The Building::tick() function will update the time and call the tick() function of each of the Floors and Elevators. The Floor::tick() function will then call the tick() function of each of Persons waiting for an elevator on that floor. The below diagram helps explain how the tick() functions will be used to carry out updates throughout the game.
There are 2 streams of information that the game will process while running:
1) A game.in file that contains all of the future events that will appear in the game.
2) The user’s inputs determining how the elevators will move.
The game.in file is essentially a long list of timestamped events. You can find a detailed guide to the format and syntax of the game.in on the Reading and Writing page here. Each event will correspond to a new person appearing on a floor, and it is the Game’s responsibility to process these events as they happen and reflect this new information to the user via the Game’s interface. This will become very important when implementing the Game::playGame function and the Reach AI.
With this information, the user will able to see what the current state of the Building looks like, and will be able to determine what they should command the elevators to do to respond to these incoming events.
At any point, the user can save the game as well. This will write the game’s current state into another file (called save.in) that can be loaded up even after quitting the game. The contents of the save-file will look identical to game.in: it will save the current location of all the elevators, the current scoring info, the current time, current people, and the remaining events. This way, we can start back up where we left off after we load a game.
To summarize all possible options, when a player is presented with the game interface, they can enter:
Q: This will quit the gameS: This will save the game- Enter a move: This will advance the game forward one turn
Game Interface
Every turn of the game, the Player will be prompted with the information about the building below:
   -------
   | | | |
9  | | | |
   -------
   | | | |
8  | | | |
   -------
   | | | | U 4   3   1   2
7  | | | | D o   o   o   o
   -------
   | | | |
6  | | | |
   -------
   |2| | |
5  |E| | |
   -------
   | | |9|
4  | | |E|
   -------
   | | | |  3   0   0   3
3  | |E| |D o   o   o   o
   -------
   | | | |U 4   3   2   1   2   1   0   0
2  | | | |  o   o   o   o   o   o   o   o
   -------
   | | | |U 2
1  | | | |  o
   -------
   | | | |
0  | | | |
   -------
    0 1 2
To decode this:
- There are 10
Floors, numbered 0 (bottom) to 9 (top) - There are 3
Elevators, numbered 0 (leftmost) to 2 (rightmost) - In the current state,
Elevator0 is servicing a request and is on its way down toFloor2 (the target floor is listed above theE, which stands for elevator) - Similarly,
Elevator2 is servicing a request and is on its way up toFloor9 Elevator1 is not servicing a request this turn (there is no number above it), and so the user can input aMovefor it if they desired. See theMovepage for more details on what types ofMoves the user can input.- Currently, there are active requests on
Floors 1, 2, 3, and 7. These are requests indicating that the people on theFloorwant to go up (note theUonFloors 1, 2, and 7), or down (DonFloors 3 and 7). Note that it is possible to have people wanting to go in opposite directions. - The
os each indicate aPerson. So, there is 1Personwaiting onFloor1, 8 onFloor2, and 4 onFloors 3 and 7. - The number above each
Person’s head refers to theirangerLevel. See thePersonpage for more info on what this means.
Should the user input a Pickup Move on a Floor, they will be prompted with the following menu:
Select People to Load by Index
All people must be going in same direction!
               O    O    O    O    O    O    O    O    O    O
              -|-  -|-  -|-  -|-  -|-  -|-  -|-  -|-  -|-  -|-
               |    |    |    |    |    |    |    |    |    |
              / \  / \  / \  / \  / \  / \  / \  / \  / \  / \
INDEX:         0    1    2    3    4    5    6    7    8    9
ANGER:         3    2    4    2    2    0    1    1    4    4
TARGET FLOOR:  8    1    0    1    2    1    0    8    1    9
Here, they can enter a string of indexes ("024" for example) to pick up the people at those indices, provided they all want to travel in the same direction. The details of this move can be found on the Move page.
Code Organization
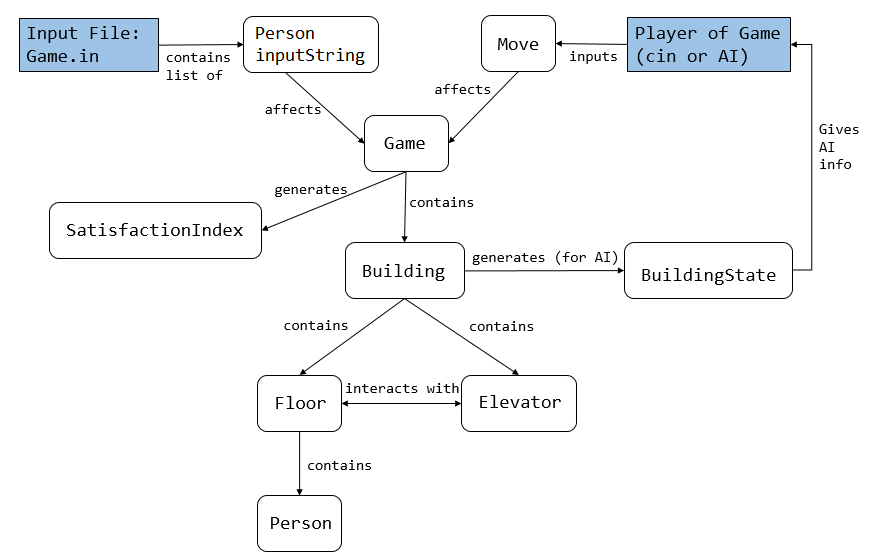
In order to tackle this fairly large project, we have given you starter code that breaks down the Game into classes that will interact with each other. It will be your responsibility to complete the implementation of each of these classes. A diagram of all the classes involved in the project as well as a high-level schematic of how they interact is pictured below.
Starter Code
We have provided you with starter code for all of the classes mentioned above, and some of them have been written for you. It is imperative that you do not change any of these implementations - doing so may lead to a zero on the project.
Utility.h Explanation: This header file contains all of the Global Constants you should be using throughout the project. Make sure to look over Utility.h to see what these values are. Think about where you want to use these values and ensure you are using them.
We have also linked in all the libraries that we think you need to complete this project. Should you feel the need to use another library, we have compiled a list of other acceptable libraries that you can #include in your .cpp files to help you. Please note that these are NOT necessary to complete the CORE.
If a library is not listed here, you CANNOT include it in your .cpp files.
sstream
cmath
algorithm
Specifications for .cpp files
As mentioned above, you will be implementing several key functions in each of the following classes. The order we’ve linked them here is a preferred order to tackle the functions, but keep in mind each class has its own difficulty ratings associated with each function you implement. You can find that information on each class’s page, linked below:
Person.cpp(Core)Elevator.cpp(Core)Floor.cpp(Core)Move.cpp(Core)Building.cpp(Core)Game.cpp(Core)AI.cpp(Reach)
Testing
It will be your responsibility to thoroughly test your own functions and ensure they are working correctly. The best way to go about this is to do something called unit testing. This will involve creating a test function in test.cpp for each class, in which you would create objects for the type you are testing, and ensuring that it works correctly. For example, a unit test for Person.cpp would look something like this.
#include <iostream>
#include "Person.h"
#include "Utility.h"
using namespace std;

void person_tests();

void start_tests() {
   person_tests();
}

void person_tests() {
    //initialize a person with targetFloor 5, anger 5
    Person p("0f0t5a5");

    cout << p.getTargetFloor() << " " << p.getAngerLevel() << " Expected 5 5" << endl;

    //simulate time being a multiple of TICKS_PER_ANGER_INCREASE
    bool exploded = p.tick(TICKS_PER_ANGER_INCREASE);

    cout << exploded << " Expected 0" << endl;

    cout << p.getTargetFloor() << " " << p.getAngerLevel() << " Expected 5 6" << endl;

    //simulate time not being a multiple
    p.tick(TICKS_PER_ANGER_INCREASE - 1);

    //no change
    cout << p.getTargetFloor() << " " << p.getAngerLevel() << " Expected 5 6" << endl;

    p.tick(TICKS_PER_ANGER_INCREASE); //7 after

    p.tick(TICKS_PER_ANGER_INCREASE); //8 after

    p.tick(TICKS_PER_ANGER_INCREASE); //9 after

    exploded = p.tick(TICKS_PER_ANGER_INCREASE);

    cout << exploded << " Expected 1" << endl;
}
While we will not be grading your test cases, to ensure correctness of your implementations, write your own tests for all the functions you implement.
Complete Elevators Run Testing
The final test case of the autograder is the only one that tests all of your solution files at the same time. It is possible to pass all other tests on the autograder yet still not pass this test. If this happens, there are one or more bugs in your solution that were not detected by previous tests on the autograder.
If you are not passing this test case, follow the testing guidelines on the Complete Elevators Run page of the specification.
Project Help
Teaching staff are eager to help you succeed with the project. Here are some resources we will have in place:
- Office hours
- Visit office hours (we encourage you to attend with your entire team) to ask questions about the project.
- Group office hours are available to get help with some of the more challenging elements of the project.
- For information about individual and group office hours check the office hours page.
- Final project tutorial session, scheduled for Sunday, October 26.
- Labs. Your lab session is a great way to find a partner and to learn what you need to complete the project.
- Tutorial videos on some of the tasks that students find challenging.
Office Hours
Office hours can be in different locations, and may change. Check the calendar below to find the times and locations of each office hours block.
- The office hour queue will still be used. There is another queue named Elevators - please use this queue.
- Times and locations may change. Please check the calendar for planning.
Support Staff
Each project will have a dedicated group of staff to help your team be successful. Each staff member will support only a single project. Here are a list of the staff who will be supporting the project.
- Alan Sun
- Ben Torralva
- Bill Arthur
- Himari Tamura
- James Choi
- Kaijian Zou
- Krithika Venkatasubramanian
- Rakesh Krishnan
- Rudra Roy
- Steve Bogaerts
- Tarunesh Verma
- Victoria Shipman
- Xiangyu Zhou